Make Kefir at Home
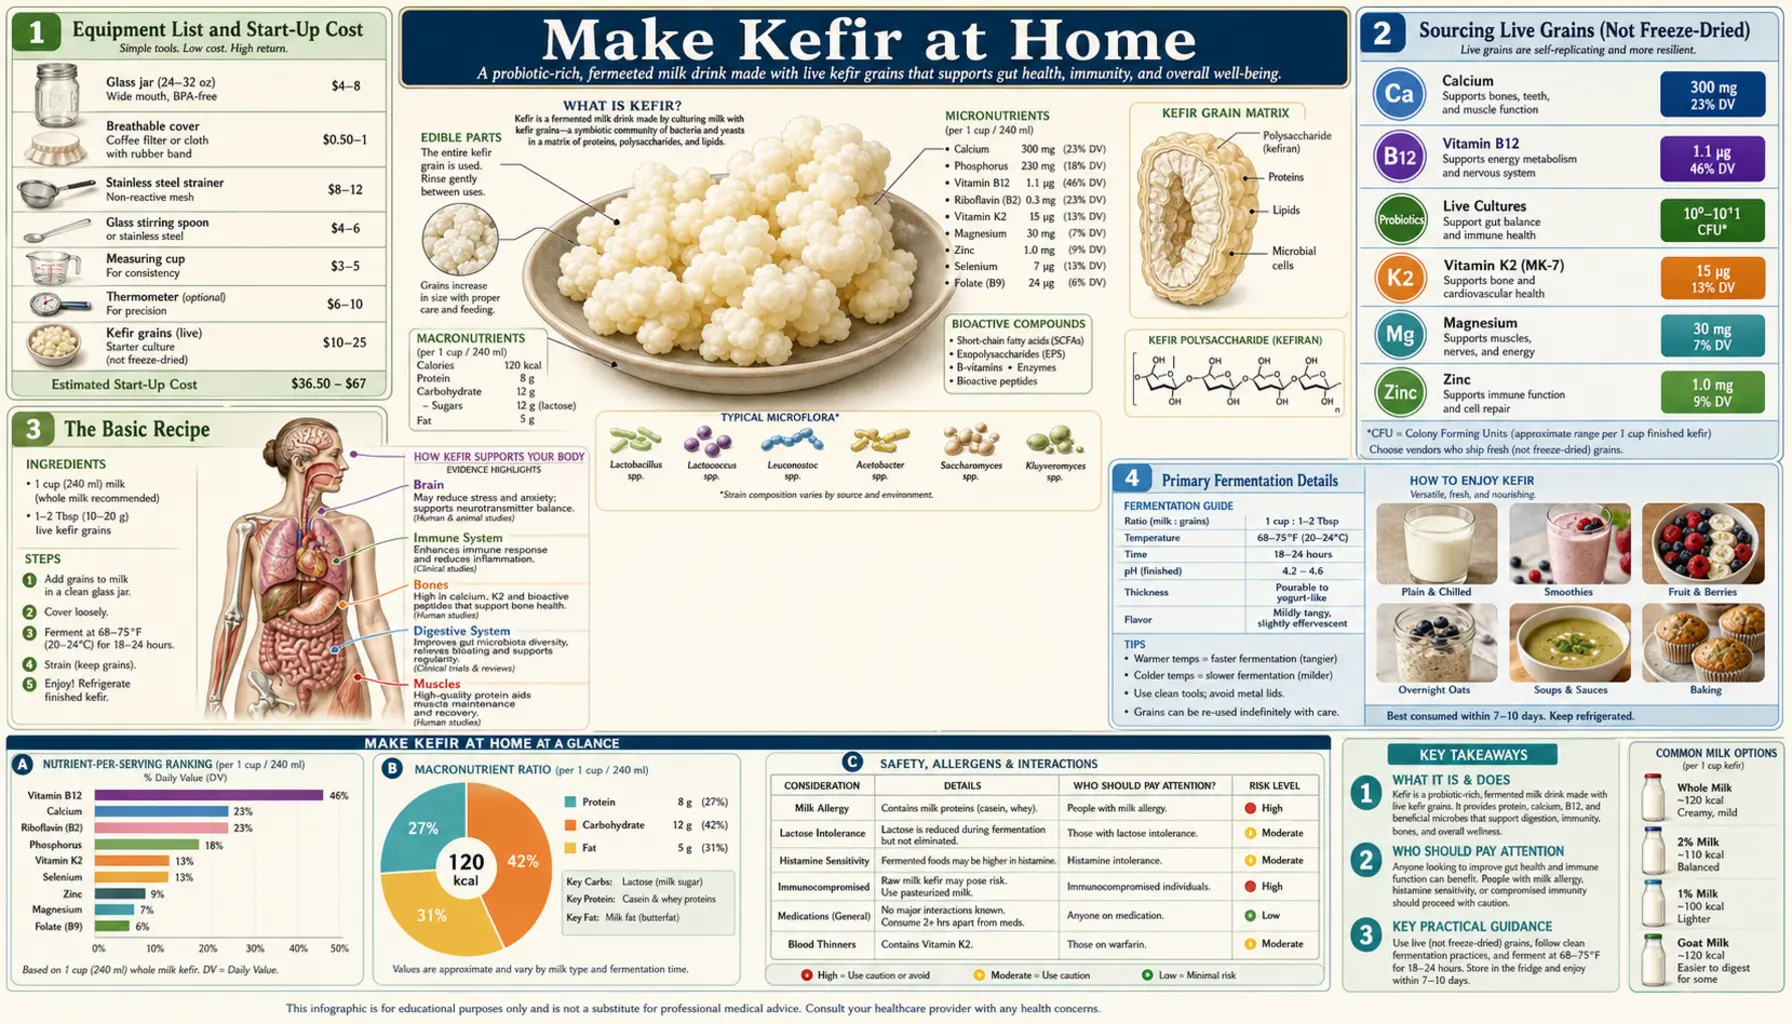
Home-fermented kefir, made from live grains rather than commercial starter culture, delivers the full 30-60 species probiotic ecosystem at viable cell counts of 109-1010 CFU/g — one to two orders of magnitude higher than supermarket kefir. The process is forgiving, requires no special equipment beyond a glass jar and a non-metallic strainer, and produces a fresh batch every 18-36 hours indefinitely once grains are obtained. Start-up cost is under $40 including the live grains. Once the routine is established, the marginal cost per liter is the cost of the milk — substantially cheaper than commercial kefir. This page walks through sourcing live grains, the basic ferment, the optional second fermentation for B-vitamin enrichment and lactose reduction, troubleshooting common problems, and long-term grain maintenance over months and years.
Table of Contents
- Equipment List and Start-Up Cost
- Sourcing Live Grains (Not Freeze-Dried)
- The Basic Recipe
- Primary Fermentation Details
- Second Fermentation for B-Vitamins
- The Plastic-or-Wood-Only Rule
- Milk Selection
- Troubleshooting Common Problems
- Long-Term Grain Maintenance
- Cost Savings vs Commercial Kefir
- Key Research Papers
- Connections
- Featured Videos
Equipment List and Start-Up Cost
The full equipment list to start fermenting milk kefir at home:
- One quart-size glass jar with loose-fitting lid (a standard wide-mouth Mason jar works perfectly; cost approximately $3-5)
- A breathable cover — a cloth, coffee filter, or paper towel secured with a rubber band, used in place of the jar lid during ferment to allow gas escape ($1)
- A plastic or stainless steel mesh strainer — avoid copper, brass, aluminum, or galvanized steel ($5-8)
- A plastic or wooden spoon or spatula for stirring and handling grains ($2)
- A second glass jar or bottle for storage of finished kefir ($3)
- Live kefir grains — the only significant cost. Available from sourdough cooperatives, fermentation hobbyist exchanges, and several online vendors (Cultures for Health, Kombucha Kamp, Yemoos). Cost approximately $15-25 for enough to start producing kefir within a week.
- Whole milk — ongoing cost; not part of initial setup.
Total start-up cost approximately $30-40. Once established, the marginal cost per liter of kefir is the cost of one liter of milk — less than $2/liter for standard whole milk, less than $1/liter for store-brand whole milk. Compare this to $4-6/liter for commercial kefir.
Sourcing Live Grains (Not Freeze-Dried)
The critical sourcing decision is live grains, not freeze-dried starter culture. Freeze-dried kefir starter cultures are sold at most health food stores, but they have several major limitations:
- The starter culture is typically only 5-10 species (versus 30-60 in true kefir grains), because most kefir species do not survive freeze-drying
- The freeze-dried culture works for only 4-7 batches before losing viability and requiring re-purchase
- The resulting "kefir" is closer to drinkable yogurt than to traditional kefir
- The cost over time (re-purchasing every few weeks) is dramatically higher than live grains, which last indefinitely
Live grains are obtained from:
- Hobbyist exchanges — the cheapest and freshest source. Look for Facebook groups, local fermentation meetups, or sourdough/preserving communities. Many home fermenters give away surplus grains because grain mass approximately doubles every 1-2 weeks under good conditions.
- Cultures for Health — commercial vendor with live milk and water kefir grains; ships dehydrated grains that revive in 5-7 days with fresh milk. Approximately $20.
- Yemoos Nourishing Cultures — another commercial source. Ships fresh (not dehydrated) grains.
- Kombucha Kamp — sells live kefir grains alongside SCOBY for kombucha.
- Etsy and local farmers markets — many private sellers; quality variable, but often the freshest option.
When the grains arrive, they typically need 3-7 days of "wake-up" ferments — shorter ferments in smaller volumes of milk to rebuild the population. Discard the first 2-3 batches (they will taste off) and begin saving the fourth batch onward.
The Basic Recipe
The fundamental milk kefir recipe is simple and tolerant of variation:
- Add 1 tablespoon of grains (approximately 15-25 grams) to 1-2 cups of whole milk (240-480 mL) in a glass jar.
- Cover loosely with a cloth secured by a rubber band. Do not seal — the ferment produces CO2 that must escape.
- Leave at room temperature (68-78°F / 20-25°C) for 18-36 hours. The milk thickens to the consistency of buttermilk or thin yogurt as it ferments.
- Stir gently with a plastic or wooden spoon every 12 hours if convenient (not strictly necessary, but improves consistency).
- When the kefir has thickened and tastes pleasantly tart but not unpleasantly sharp, strain through a plastic or stainless steel mesh strainer into a clean container. The grains are caught in the strainer.
- Place the grains in a fresh batch of milk for the next ferment and refrigerate the strained kefir for consumption. The cycle repeats indefinitely.
The strained kefir is ready to drink immediately but improves with 24-48 hours of cold storage in the refrigerator (which allows residual lactose to be further fermented and additional B-vitamins to be synthesized by the cold-tolerant microbes). Strained kefir keeps well for 2-3 weeks refrigerated but is best consumed within 1 week.
Primary Fermentation Details
The 18-36 hour primary ferment window is the main variable to adjust. The factors that affect ferment speed:
- Grain-to-milk ratio — the standard 1 tablespoon grains per 1-2 cups milk produces a 24-hour ferment at room temperature. Higher grain ratio (1 tablespoon per 1 cup) produces a faster, more acidic ferment. Lower ratio (1 tablespoon per 4 cups) produces a slower, milder ferment but increases the risk of off-flavors due to dilution of the protective bacteriocin and lactic acid concentrations.
- Temperature — ferments faster at warmer temperatures. At 78-80°F summer kitchen temperatures, ferment time can drop to 16-20 hours. At 65-68°F winter temperatures, ferment time extends to 30-36 hours. Above 85°F, the ferment can become unbalanced as yeast activity outpaces bacterial activity, producing excess alcohol and off-flavors.
- Milk type — whole milk ferments more consistently than skim or low-fat milk because the fat provides nutrients for the microbes. Ultra-pasteurized milk ferments more slowly than regular pasteurized milk because some of the proteins that microbes use are denatured. Raw milk ferments fastest but is increasingly hard to source legally in the US.
- Grain health — older, well-established grain colonies ferment faster than newly-revived grains. After 2-4 weeks of regular ferments, grains reach peak activity.
Indicators that the primary ferment is complete:
- The milk has visibly thickened and started to separate into a thicker top layer and thinner whey layer
- Tilting the jar slowly produces a smooth slow flow, like buttermilk, rather than the original liquid pour of fresh milk
- Tasting shows pleasant tart-tangy flavor, mild yeasty aroma, and no off-flavors
- Small bubbles are visible throughout the ferment from yeast CO2 production
If left too long (typically beyond 48 hours at room temperature), the ferment will continue to separate into curd and whey, become unpleasantly sharp, and may develop off-flavors. Salvage by stirring back together and using in cooking (the over-fermented batch makes excellent baking buttermilk, salad dressing base, or marinade) rather than for drinking.
Second Fermentation for B-Vitamins
The optional second fermentation is a refrigerated, slower ferment of the already-strained kefir, typically 24-72 hours. The goals of second fermentation:
- Reduce residual lactose further — cold-tolerant lactose-fermenting yeasts continue to consume lactose at refrigerator temperatures, reducing residual lactose by another 50-70%. This is the step that makes kefir tolerable for severely lactose-intolerant consumers.
- Increase B-vitamin content — particularly B12, biotin, and folate, all of which continue to accumulate during cold storage.
- Mellow the flavor — the sharp lactic-acid character softens, and a more complex fermented-dairy profile develops.
- Optional flavor infusion — vanilla bean, citrus zest, cinnamon stick, or a small amount of fruit puree added during second fermentation infuses the kefir without disrupting the microbial ecology.
The protocol is simple: pour the strained kefir into a clean glass jar or bottle, seal loosely, and refrigerate. The second ferment is self-regulating — by day 3-4 refrigerated, microbial activity slows substantially, and the kefir is at maximum maturity. Consume within 7-10 days of second fermentation start.
The Plastic-or-Wood-Only Rule
A common admonition in fermentation guides is to avoid metal contact with kefir grains. The rationale is partially valid and partially overcautious:
- Reactive metals (copper, brass, aluminum, galvanized steel, raw iron) genuinely should be avoided. The low pH of fermenting kefir (~4.0-4.5) leaches metal ions from these materials, both contaminating the kefir and damaging the microbial community. Copper, in particular, is acutely antimicrobial.
- Stainless steel is fine. Food-grade 304 or 316 stainless steel is non-reactive at kefir pH and is the standard material for commercial kefir production equipment. The "no metal" rule does not apply to stainless steel strainers, spoons, or jars.
- Brief contact is fine. Even reactive metals will not damage the grains in seconds of exposure. The concern is sustained contact during the ferment, not brief contact during straining.
The practical rule: plastic or wood for sustained-contact items (jars, lids, long-term storage containers); stainless steel acceptable for transient-contact items (strainers, spoons used briefly for stirring). Glass for the ferment vessel itself.
Milk Selection
The milk used to feed the kefir grains affects both the resulting kefir and the long-term health of the grains:
- Whole milk (3.25% fat) is the gold standard. Highest microbial activity, best flavor, longest grain viability.
- 2% and 1% reduced-fat milk work acceptably but produce thinner kefir and slightly slower grain growth.
- Skim milk works but produces noticeably thin kefir and slower grain growth.
- Ultra-pasteurized (UHT) milk — works but ferments more slowly because some nutrients are denatured by the higher heat treatment. Use if regular pasteurized whole milk is unavailable.
- Raw milk — ferments fastest and produces most complex kefir, but legal access varies by state and there are food-safety considerations independent of the kefir process. If raw milk is used, source from a known producer with rigorous testing.
- Goat milk and sheep milk — both work for milk kefir and produce slightly different flavor profiles. Goat milk kefir is more tart and tangy; sheep milk kefir is creamier and richer.
- Plant milks (almond, oat, soy, coconut) — generally do NOT work for milk kefir grain feeding because the grains need lactose for long-term health. Even with added sugar, plant milks will gradually starve the grains and the grain mass will shrink. Plant milks can be used as one-off "experiments" but not as long-term feeding.
- Lactose-free milk — counter-intuitively, also does NOT work well for long-term grain feeding because the kefir microbes need the lactose substrate. Use regular milk and let the fermentation reduce the lactose.
For consumers who cannot use dairy milk at all, the alternative is water kefir / tibicos — see our Tibicos page.
Troubleshooting Common Problems
- Over-fermented batch (too sharp, separated) — shorten ferment time, reduce ambient temperature, or increase milk volume per tablespoon of grains. Salvage the current batch by using in cooking.
- Slow ferment / not thickening — grains may be cold-shocked (use warmer milk, slightly warmer kitchen temperature), undernourished (use whole milk instead of skim), or just recovering from a previous over-ferment. Continue with normal recipe; grains typically recover within 2-3 cycles.
- Off-smell (sulfur, vomit, or vinegar) — usually contamination. Discard the batch, rinse grains gently in fresh milk (NOT water — water shock kills the surface microbes), and restart with a smaller-than-usual batch. If the problem persists across 3-4 batches, the grains may be irreversibly contaminated and need to be replaced.
- Grains not multiplying — normal grain growth doubles mass every 1-2 weeks. Slow growth may indicate cold conditions, mineral deficiency (rare with whole milk), or insufficient ferment time. Increase ferment time slightly and ensure consistent room temperature.
- Grains shrinking or disintegrating — serious problem. Likely causes: water shock from washing in water, metal contamination, excessive heat (above 90°F), prolonged refrigeration without milk change, or starvation (too long between ferments).
- White surface film (kahm yeast) — uncommon in healthy milk kefir but possible. Skim off, reduce ferment time, lower ambient temperature.
- Pink or fuzzy mold of any color — discard everything immediately including the grains. Start over with fresh grains.
Long-Term Grain Maintenance
Kefir grains can survive for decades with proper care. Long-term maintenance considerations:
- Continuous ferments are healthiest. Grains maintained in continuous active ferment (a new batch every 24-48 hours) thrive indefinitely. Multi-decade lineages exist in families that have maintained continuous ferments since the early 20th century.
- Short-term storage (1-2 weeks) — place grains in fresh milk in the refrigerator. They will slowly continue to ferment but at greatly reduced rate. Change the milk weekly.
- Medium-term storage (2-8 weeks) — same as above; check weekly and change milk if it has visibly thickened. Grains may shrink slightly during extended cold storage and need 1-2 wake-up ferments to recover.
- Long-term storage (months) — dehydrate the grains by spreading thinly on parchment and air-drying at room temperature for 2-4 days until completely dry and hard. Store in an airtight container in the refrigerator or freezer. Dried grains can be revived months later with 3-7 days of patient wake-up ferments in small volumes of fresh whole milk.
- Sharing surplus grains — with normal continuous ferments, grain mass doubles every 1-2 weeks. Excess grains can be given away (the traditional practice in kefir-using cultures), eaten directly (rich in probiotics and protein), composted, or dehydrated for backup storage.
Cost Savings vs Commercial Kefir
For a household consuming kefir regularly, home production produces significant cost savings over time:
- Commercial kefir cost — approximately $4-6 per liter ($5-7 per 32-oz container). For a daily 250 mL serving, that is approximately $1-1.50/day or $365-550/year per person.
- Home production cost — approximately $1-2 per liter (cost of milk). Daily 250 mL serving is approximately $0.25-0.50/day or $90-180/year.
- Annual savings per person — approximately $200-370/year, depending on consumption level and milk choice.
- Start-up cost recoupment — the $30-40 start-up cost is typically recouped within 1-2 months of regular consumption.
For a family of four consuming kefir daily, annual savings can exceed $1,000, plus the additional value of dramatically higher probiotic diversity and CFU compared to commercial kefir.
Key Research Papers
- Hertzler SR, Clancy SM (2003). Kefir improves lactose digestion and tolerance in adults with lactose maldigestion. Journal of the American Dietetic Association. — PubMed
- Walsh AM et al. (2016). Microbial succession and flavor production in the fermented dairy beverage kefir. mSystems. — PubMed
- Garrote GL, Abraham AG, De Antoni GL (1997). Preservation of kefir grains, a comparative study. LWT - Food Science and Technology. — PubMed
- Witthuhn RC, Schoeman T, Britz TJ (2005). Characterisation of the microbial population at different stages of Kefir production and Kefir grain mass cultivation. International Dairy Journal. — PubMed
- Beshkova DM, Simova ED, Frengova GI, Simov ZI, Spasov ZN (2003). Pure cultures for making kefir. Food Microbiology. — PubMed
- Sarkar S (2007). Potential of kefir as a dietetic beverage — a review. British Food Journal. — PubMed
- Guzel-Seydim ZB, Kok-Tas T, Greene AK, Seydim AC (2011). Review: Functional properties of kefir. Critical Reviews in Food Science and Nutrition. — PubMed
- Otles S, Cagindi O (2003). Kefir: a probiotic dairy-composition, nutritional and therapeutic aspects. Pakistan Journal of Nutrition. — PubMed
- Farnworth ER, Mainville I (2008). Kefir: a fermented milk product. Handbook of Fermented Functional Foods. — PubMed
- Wszolek M, Tamime AY, Muir DD, Barclay MN (2001). Properties of kefir made in Scotland and Poland using bovine, caprine and ovine milk with different starter cultures. LWT - Food Science and Technology. — PubMed
- Magalhaes KT, Pereira GVM, Dias DR, Schwan RF (2010). Microbial communities and chemical changes during fermentation of sugary Brazilian kefir. World Journal of Microbiology and Biotechnology. — PubMed
- Leite AMO et al. (2013). Microbiological, technological and therapeutic properties of kefir: a natural probiotic beverage. Brazilian Journal of Microbiology. — PubMed
PubMed Topic Searches
- PubMed: Kefir grain fermentation
- PubMed: Kefir lactose reduction
- PubMed: Kefir B-vitamins
- PubMed: Kefir grain preservation
- PubMed: Kefir milk selection
Connections
- All Food
- Kefir Overview
- Kefir Benefits Hub
- Probiotic Diversity
- Gut Microbiome and Immune
- Tibicos vs Milk Kefir
- Milk
- Yogurt
- Fermented Foods
- Probiotics
- Lactose Intolerance
- Irritable Bowel Syndrome
- Vitamin B12
- Vitamin K2
- Calcium